Ketogenic diet – take 2, boots to the ground – second week – Thursday thru Saturday

Being the end of the second week of ketogenic eating, I figured I’d close the week out with a post.

Nothing much different happened, just the same good stuff.  My body is remaining stable with glucose, as well.  I’ve decided to change the numbers of meals per day to reflect a lessened time per blood insulin increase which happens no matter what you eat.  I was eating 4 meals per day, but I’m lessening to 3 for now.

One change I did include into this week was a fasting period.  It gives the body time to burn off glucose & glycogen stored.  It also helps with lots of other things non-related to weight loss like HGH increase, lowering any insulin resistance, and helping the body in general clear itself out instead of constantly needing to deal with energy conversion.

I’ve done ketone testing today as well (just as last saturday), and I was at 2.6 mmol/l.  It seems all the numbers are right where they need to be, thankfully.  Weight-wise, this week I lost 6 lbs.  I’ve also decided to include 30-minute cardio bicycle activity into the mix for heart-health since I will be more bicycle-friendly with the cooler weather coming in a month or two and a new bicycle finally arriving soon.  One thing I have noticed since ketogenic eating is that the oxygen absorption of the muscles & body during cardio activity seems to be a lot more prominent.  I’ve been able to last longer without the issues I’ve had in the past. (when I was a cyclist, and weighed less as well).

Ketogenic diet – take 2, boots to the ground – second week – Monday thru Wednesday

With this week, I can feel my body becoming more adapted to energy usage.  The amount of energy pulled from food I can feel being stored and used without feeling tired and groggy.  It’s a slow progression, but very noticeable after 8:00pm at night.  Normally, my body progresses into a state of tiredness and not being able to think much past 8:00pm.  Now, I can feel myself far more cognitively alive.  Not a good thing when your wanting to sleep, but I’ll definitely jump at it since it’s a start of something happening.

My weight within the last week has dropped by quite a bit.  Water weight was lost last week within the beginning, going from 236 lbs to 230 lbs.  Within the last 5 days (since this past saturday July 28th) weight has dropped from 226 lbs to 222 lbs.  I am finding now that my body works better when I recalibrate the macro nutrient amounts every week.  The page https://keto-calculator.ankerl.com helps extensively with finding the amount of macro nutrients needed for a particular calorie amount.
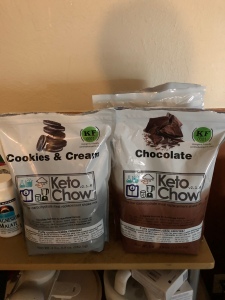
Since I am using Keto Chow, the daily macro nutrients are mostly taken care of by simple math.  On the back of each Keto Chow bag, the nutrient listing is visible per scoop with the gram weight of each scoop available.

What I do is take both the weight along with the calorie listing separately, and multiply by 3 for the weight of the Keto Chow powder for the entire day. (i.e. take the calories per scoop and multiply by 3, and take weight in grams of scoop and multiply by 3)
I then take the daily calorie amount to be consumed, and subtract the amount of daily calories for the powder.  This gives you the amount of calories for oil throughout the day.
Take the daily oil calories, divide by 8, then multiply that by 0.93 for the amount of oil needed daily in grams.  This is for avocado oil.  Divide that gram amount by 3, and that is the amount of oil used for each of the 3 meals.
Simple math:  (calories for day – calories of powder) / 8 ) x 0.93 = grams of oil used daily

With 3 meals daily, each meal would be 1 scoop serving mixed with the amount of daily oil divided by 3.  Add oil, scoop of powder, then water.  Mix this up good and well, then chill for at least 30 mins to an hour.  (I do overnight)  That’s it.  It’s actually quite amazing how satiating it is when that much fat is able to line the stomach.  Be sure to drink lots of water through the day, as keto consumes lots through digestion.

IMG_2513

My daily week of 1,200 calories for Mocha will be:
144 grams daily of Keto Chow powder / 3 meals = 48 grams per meal
( ( 1200 kcal daily – 402 kcal of powder ) / 8 ) x 0.93 ) = 93 grams avocado oil / 3 meals = 31 grams oil per meal


Ketogenic diet – take 2, boots to the ground – first week – Thursday thru Saturday

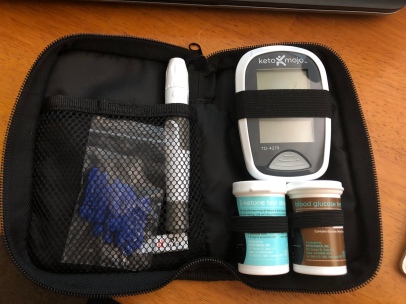
I’ve decided to take advantage of the fact that the market is actually offering tools to measure ketones in your blood, so I ordered a ketone monitoring system.  It’s basically just like a glucose monitoring system for diabetics, in fact it does that as well just with two different style test strips to be used.  I’m doing it to make sure my blood ketone level is within tolerance, and not going way over or under.  The optimum level is 1-3 mmol/l.  After shopping around for longer than I would have liked with keto being a trend now, I found one that is less expensive than most per test strip while having a good track record of precision.  The brand is keto mojo (www.keto-mojo.com) which does both glucose & ketone level monitoring with two different types of test strips.  It comes with 10 ketone test strips, and are about $1/test strip when purchased separately.

fullsizeoutput_8fe

I was on intermediate fast from 11:00pm until 12:00 noon (13 hours) before using the monitor for the first time.  I set it up first per instructions and ran the code chip through.  I then used an alcohol wipe to clean my finger off, dropped a ketone strip into the top loading slot of the keto mojo, lanced my finger at 4/6 setting on the lancet, squeezed a drop of blood out and touched the tip of the test strip to the drop.  That’s about all there is to it, then wait 5 seconds as it counts down while processing.

I’ve only really been on the ketogenic diet since July 11th, and during that time I’ve been almost entirely on Keto Chow meal replacement powder with avocado oil.  (Occasionally at restaurants with friends and had to improvise of course). Currently, Keto Mojo is measuring my blood at 2.3 mmol/l, which is obviously between 1 & 3 which is a good thing to see.  I’m going to monitor my blood once or twice a week, more than likely in the mornings due to fasting time.

I do have to say that the weight loss from keto is effective.  I started 10 lbs heavier than I am right now, and while the first 5 or so pounds are water weight on keto, there’s obviously more than 5 lost.  I know the loss rate will drop since my calorie intake is more geared towards 1-2 pounds per week and not more.

Ketogenic diet – take 2, boots to the ground – first week – Monday thru Wednesday

With everything going on in life, I haven’t had a chance to post my first update since I’ve started take 2 of my ketogenic diet.  I’ve been anxious to come back and post about my experiences.
With my preparation of eating meal-replacements for a while (Soylent, a non-keto food) to prepare myself to eating keto-style meal-replacement, it really took no work to start eating ketogenic.  Before going too far, I’ll just say that since I’m busy and I’m also aiming to correct my weight by a large amount, I’m using a meal-replacement powder mixed with avocado oil and water.  It’s called Keto Chow, a brand name sold by Chris Bair at http://www.ketochow.xyz and I’ll be honest it’s been ironed out to work nicely.

The first (official) ketogenic week has worked out nicely, and I’ve taken the time through research to find out my body feels far more satiated and not hungry when eating a keto diet.  I went as far as going into an intermittent fasting (not eating) from noon yesterday until noon today… without really being hungry.  Today I did start feeling my belly grumbling around 11:30am, so that was my first serving for the day.  (x1 325 kcal keto chow drink)  Since quite a bit of it is fat, it kept me full until 3:30pm-4:00pm when I had another just to stay on time.  I then went to the gym and 5:30pm and then had my 3rd keto chow drink.  I then went home and relaxed until just now (7:15pm) when I’m having my last keto chow drink while posting this.

I’m mixing intermittent fasting in with my ketogenic diet due to the research I’ve read showing how the two work together nicely for burning fats.  My primary plan is to concentrate my meals between noon & 8:00pm, leaving 8:00pm through 12:00 noon of the following day as an intermittent fasting period.  This allows the body to not only deal without food, but also to clean toxins out while food is not being processed.  It’ll take a few weeks to fully be in ketosis (when the body switches from burning carbs as fuel to burning fats due to depletion), so on we go to the rest of the week!

Ketogenic diet – take 2


After doing the ketogenic diet about 6 months ago, I figured I’d leave a bit of time for myself to reclaim my pride since I bailed. I decided now to go back to trying it again, only acclaimate myself to meal replacement drinks before jumping into Keto chow.
About 1 week ago I started the Keto chow brand ketogenic diet drink, which makes it much easier to eat in a ketogenic fashion without needing to worry about what contains carbohydrates and whatnot. So far I have to say, the product has come a long way and is more filling along with easier to whip up. I like having 4 small meals a day (like the zone diet), so I take the full days size of powder and divide by 4 then use that per drink.
It’s very simple, I use avacado oil as my fat source for the drink (which is almost taste free and very friendly to your digestive system), instead of heavy cream as they recommend since I’m lactose intolerant. If you figure there are 8 calories per gram of avacado oil, it’s easy enough to divide the amount of calories desired by 8 and get the number of grams to use. The idea is that the powder contains all nutrition and protein, while the added oil (or heavy cream) contains the fat the body needs. The concept of ketogenic is to withhold carbs as the body goes through ketosis, which then causes the body to use the stored fat as it’s primary energy source. It requires a bit of change in diet and control as well, but ultimately it can help blood pressure along with sugar levels in the blood.

In comes the cavalry, an easy to use meal replacement drink that can assist in moving towards ketosis.  I aim for 1,600 calories a day, with 41g avacado oil & 33-41g Keto chow powder per drink, depending on which flavor since each weigh different.  After that, this with that along with water and shake it up:

and this is one of four of the mixer bottles I use to mix them up & sit in the fridge for an hour or two.  After that, I pour each into their own hydro flask insulated container (20 oz), and put in the fridge until morning.

its a world of its own, and takes a bit of endurance since the first couple days require burning off the bodies glycogen to reach ketosis.  Once that happens, it’s all about drinking water & electrolytes along with the meal drinks and that’s it.

lets see how things go.  So far I’ve dropped water weight of 5-6 lbs, but that comes and goes through life.

Macbook Pro on battery – lid closed without issue

I’ve used Macbook Pro for years now, and up until I picked up my latest 2017 Macbook Pro I never worried about having external monitors.  It wasn’t until an incident with my iMac having a video module go out that I figured It’d be best just to have one computer for everything.  That’s when I picked up the latest 15 inch Macbook Pro, and dual monitors plugged in with HDMI to USB-C adapters.  (MUCH sweeter than previous setups on systems)  The biggest problem I ran into was not being able to close my laptop screen with the external monitors attached, without the system going into standby mode.  Before anyone says anything, the heat is expelled through the bottom on left and right openings to avoid the monitor being closed being an issue.

Up until MacOS High Sierra came out, I was using a 3rd party application called InsomniaX to keep the system from sleeping when the lid was closed.  It’s a great application, but for some reason stopped disabling lid sleep on battery when I installed High Sierra.  Problem.  After research, I found the easiest way is to run the following as admin in the terminal:
sudo pmset -b sleep 0; sudo pmset -b disablesleep 1

The following simply sets sleep time to 0, and disables sleep.  Since I use terminal quite a bit (I’m a Unix engineer), I put the following into ~/.bash_profile:
alias sleepoff=’sudo pmset -b sleep 0; sudo pmset -b disablesleep 1′
alias sleepon=’sudo pmset -b sleep 5; sudo pmset -b disablesleep 0′

With that, it’s easy enough to just type “sleepoff” at the prompt instead of the whole line… and if you want to enable sleep capabilities then type “sleepon”.

Anyway, not a breakthrough in science but it does fix a gripe.  Hope it helps someone.

Neurological issues

Today was a big deal for me personally and I wanted to share it with anyone else who may go through the same thing.
I woke up in the morning with no issues but for some reason when dealing with an issue with my cat that should have been a very small issue, my mind decided to send a signal through itself that began a chaos signal. That’s the only way I can put it. I could feel a feeling of suffocation rising up through my neck and throat, it honestly felt like death was coming. At that time, I didn’t care, and let it keep coming because there is nothing I could do. (I worry about other people, not myself).
It was a brain blip… one of the most chaotic things you could imagine. I literally found myself with NO other memories after. Like NONE.
I found myself trying to figure myself out at that time. There was lots more but that’s the most I’ll go into. It was 2-3 hours later that my memory returned slowly. It was the worst time of my life.
Now I’ll just say…. it’s nothing more than losing who you are. I’ve thought about it and when you lose who you are and what you know, it takes the very foundation of life away. As I sit here typing this I think about how I can remember things from 10-20..30 years ago… and then I think about how it felt losing the memory. It felt worse than death.

If you go through this, honestly I really do wish I could hug you so tight. It’s hell, and I never want anyone else to feel it.

Learning about people

I’ve learned quite a bit about people over the last few years and more so over the last year.
I’m noticing that people only devote as much time to you as they feel will gain them some form of income… be it your time helping them, or some other positive in their direction. Once it goes outside of that arena, I notice people will back away and disconnect from you no matter the amount of time. That’s slightly disconcerting when you’ve devoted a space of time to a person and those rules are applied.

21 years ago I began talking to a woman. We were close, but at the time things weren’t going to work out and we knew it. Somehow, we started talking again about 4-5 years ago. It was great but bad things happened and money became scarce. Of course I helped but there’s only so much a guy can help when he is 4-5 states away. Time drifted us apart for 2-3 years except texting randomly. Voice didn’t happen, and when it’s only text at that point it’s not real to me.. and I’ve said that.

So now I sit, caring about someone who is migrating by foot to California. I’m not Into asking why or whatever. When you have to beg to physically speak with someone, it tells me there’s a huge disconnect, and I’m not going to try.
I guess this is a documentary.

My Second Kombucha Wood Barrel

As seen in my previous blog (https://wp.me/pmBQH-yV) about purchasing a Kombucha wooden barrel from barrelsonline.com, I purchased another wooden barrel of the same kind in order to allow a staggered fermentation cycle and not do without Kombucha for a period of time while fermenting.

fullsizeoutput_8bb

In the above picture, the barrel on the left is the first barrel I purchased and the barrel on the right is the second barrel purchased.  For the new barrel, you will notice a stainless steel spigot instead of a wooden spigot as the first barrel has.  This is because I chose to try one out 3rd party since the wooden spigot is a bit tight to turn on/off which makes filling a bottle a touch hairy.  I also chose to not use lacquer on the outside to allow kombucha breathing through the wood.

The new barrel has been treated much like the first, except I simply took it outside and filled it with a water hose.  1 hour soaking, emptied, 1 hour soaking, emptied, 48 hour soaking, emptied and brought inside to fill with sweetened black tea.  It’s been in operation now for 1 day starting yesterday evening, and there have been no issues at all.  I’m impressed since this will be my second barrel, and I’ve seen posts from people stating that their barrel was horrid, leaked continuously, & was filled with glue.  Now, I will say the barrels do have wax to seal between the planks along with the ring of wood on the top.  This is apparent when you use hot water while washing/soaking and you can see the wax melting and changing clear while doing so until it cools.  It is also what seals any miniscule leaks that may form, as can be seen in the picture of the old barrel on the left.  The darker streak of color running down the plank seam formed from kombucha coming through as a moisture and the wax sealing that area.  The same occurred around the spigot insert.  That was all, nothing more.  That impressed me – a self-healing barrel.  Note that the inside does not have this since it was washed & rinsed.

Anyway, another barrel without any issues.  I’m happy with barrelsonline.com and their Kombucha barrels.  At least the 5-gallon ones 😛

American Oak Wood Barrels for Kombucha

I’ve been making Kombucha off and on for the last 4 years.  Recently, I’ve decided I’d get into it a little more seriously, since I can feel my body needing all the help it can get.  After doing a few brews for 3-6 week stints to experiment with flavor and sourness, I’ve found that I have more energy in general when I drink it… the non-caffeine energy.  So, I decided to go with a bigger container, but wanted something unique.  After doing research, I decided to go the route of a continuous brew oak wood barrel.

There are lots of places to buy wooden barrels, however only a handful that make them sitting vertically like this and have a hole at the top, along with a spigot hole made for being a spigot hole and not simply a bung hole in the middle like horizontal barrels.

The place I purchased mine was from http://www.barrelsonline.com. ($128+shipping which was $29.99)  The reviews weren’t good, but I figured I’d give it a shot since the alternatives from other companies didn’t seem much different and were quite a bit more pricey.  This particular one is 5-Gallons, with galvanized steel hoops that wrap around the barrel, and the wood is charred American Oak.  They say the order takes 14 business days, and I’d say from start to finish it was about that time.  It was shipped from Mexico, and while I’m not happy about that it didn’t seem that it effected the quality.  I chose a full-wood spigot, and the barrel to not be varnished so it could breathe.  The lid I didn’t care about so I chose cork… even though it’s never on and I cover it with a cloth cover I bought from Kombuchakamp.com with elastic to hold it on.

Below you can see the wood residue floating in the water before it was emptied the first time.

barrel2

Prepping it wasn’t hard, for me at least.  I’m kinda redneck’ish, so bear with me.  I put the barrel in my shower, and filled it with super-hot water from my hand sprayer.  Once I filled it entirely, I let it sit for an hour or so to let the wood expand/swell.  Honestly, it didn’t leak much at all and I was surprised.  I picked it up (held the top and bottom), and flipped it to dump the water out into the shower, then sat it back down again.  I repeated the process 3-4 times, with the final time being cold water.  The last time I made sure the sides weren’t leaking at all, and they weren’t.  I wiped it down, then took it out the the kitchen.

kombucha barrel

I had 2 1-gallon glass containers with Kombucha already brewing, so I dumped those in as a starter batch.  I then brewed up a 2-gallon pot of black tea, threw 2 cups of sugar in and stirred it up, leaving it cool to room temp.  After, I tossed that into the barrel which made the level reach almost completely to the top!  I threw the cloth cover on that is in the picture, and left it go.

After a week, I came back to look at how things were going.  I was surprised to find a nice sized Kombucha SCOBY (symbiotic colony of bacteria and yeast) floating on the top already!  I left it go another week, and that SCOBY grew quite a bit, and lodged itself into the walls.  After pouring a cup from the spigot, the SCOBY looked like something from the movie Aliens, and gripping the walls ahah.  I knocked it off the walls and pushed it down into the kombucha to get wet, then covered it back up.

I am very happy with it so far.  The small line of moisture you see in the picture above appeared a couple days after I started brewing, and it was kombucha coming through.  It was simply moisture, and within a couple of days the wax filled the holes up and made everything perfect.  This barrel does a great job of keeping the sun and light away from the bacteria/yeast and lets everything do it’s job without any interruption.
The spigot does take a bit of muscle to twist due to being wood on wood, but it works nicely.

I have another barrel coming so I can have an uninterrupted barrel and another for brewing that can be emptied halfway into the other barrel for drinking.  This will allow the sugar to be added with the new tea, and not interrupt the content of the kombucha being drank.

Let’s hope the second one is as good as the first.  Also, the words “kombucha” I had laser printed into the front by the company before sending it as a part of the purchase for free.  You can choose whichever words you want, and as you can see I’m very inventive.