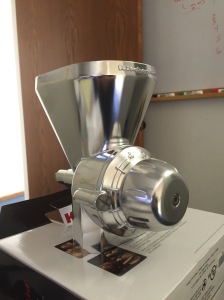
I needed a grain mill that would crack & split dry soybeans so I could easily remove the hulls. The problem is, there’s not many created that are good at that task for some reason. Sure, some of the less available or more expensive models are good at it (e.g. Family Grain Mill, Porkert universal grain mill), but why spend more money when I already have a kitchenaid attachment for grain mill use? The issue is that it doesn’t have the setting for it, and needs to be modified. I just did that today, and ran some dry soybeans through it perfectly.
The Kitchenaid KGM grain-mill attachment is nice in the fact that it’s all metal, and not many parts to it. The bad part is that it’s made from the factory for smaller grain grinding. However, since the design is so simplistic, it’s relatively simple to change that.
What I did was turn the adjustment knob all the way to the left until the pointer was on the large grain setting. Then, I used a #4 hex wrench (allen wrench) to unscrew the holding screw in the middle of the adjustment knob.
Once that is unscrewed, pull the screw and safely set it aside. Carefully slide the adjustment knob off, and you will notice a spring-loaded pressure pin underneath the adjustment knob. It adds the clicking sound when the wheel turns, and provides uniform pressure to make it feel firm when you turn it. Remove the pressure pin and the spring, and safely set it aside.
Now comes the adjustment! Before doing anything from this point, realize that unless you make notes/marks to return it to stock settings, all stock settings will be lost. It’s best to be aware of this before going any further
What I did was unscrew the center threaded post, which the adjustment knob was attached to, 1-2 turns left which made it pull out a bit. Then, I grabbed 1/4 cup of soybeans, turned the Kitchenaid stand-mixer to 10, and fed 5-10 soybeans into the grain-mill to see the outcome. If it’s splits them in half, you’re spot on and can take the final step of reassembly. If needing to go more, turn left a bit more and try again. If you went too big, turn right to tighten and try again.
Once you have the setting to your desire, place the spring-loaded pressure pin back into the hole it came out of. Be careful not to smear the grease all over the place, since it’s necessary to lubricate. Place the adjustment knob in your hand with the pointer in the position for the largest grain on the mixer, and put it back into place carefully. Make sure the pressure pin is to the left of the pointer when you re-install the adjustment knob – simply turn the knob once you’ve placed it on, to make sure. Once you are sure everything is fine, re-insert the scew to the center of the adjustment knob and tighten it up. From there, you’re done and ready. I ran mine through a test run of 1/4 cup soybeans at largest grain setting just to make sure everything was set correctly. They come out cracked, with hulls sitting separate from soybean grain.
I also took this time to run some coconut oil over the bearings of the grinder shaft where it inserts into the assembly, which makes the vibrations much less. Lard, or any thick food-grade grease would work as well.


Hello, the adjustment knob of my grain mill came loose and even though I have readjusted it so the plates touches when set on finest setting it still only grind coarse . Would you be able to help me find the wright adjustment? Am worried if i thightnen any more the plates will get damaged. Thanks so much
Hi Jeremy
I don’t really know the device too terribly well, honestly. That was one of the reasons I was so careful about keeping the bar still as I removed the knob and repositioning it. That being said, I wouldn’t tighten the plates any more than just before touching, since any more pressure would start tearing into the plates instead of any grains falling between the plates. If the plates are that close you can then with trial-and-error put a couple of soy beans (or other beans) through to see how fine/course it’s been ground and make changes from there.
I haven’t taken it apart since I’ve written this article but also maybe make sure the pressure plates that are pushing the plates together (have I said “plates” enough yet?) are still taunt and pushing properly. That might be the culprit, but other than that I’m at a loss without completely disassembling mine.